Showing posts with label Nutrition. Show all posts

Thursday, October 24, 2013

Balancing Hormones Naturally {for Moms}

Women’s Hormonal Detoxification and Balancing Program
Photo Source

When I was a youngin', pregnant with our first child, I remember teasing my husband one day, quipping that 'wasn't he glad that I didn't cry at the drop of a hat like those other pregnant women?'

I didn't experience hormonal issues back then. In fact, I didn't until my sixth pregnancy.  Near the end of that pregnancy, I began feeling angry for no apparent reason.  I realized then that I was experiencing the dreaded hormonal shifts that I had only heard other women talk about.  Even still, it wasn't too bad, and it was usually short lived.

Each pregnancy following, I would experience those irritable and angry feelings a little sooner in the pregnancy than the one before.  It was getting worse.  Those shifts were so unpredictable in my third trimesters that I knew I needed to do something about them or else my poor family would suffer.  Or tie me up and throw me in the closet.

Read the full article at The Marathon Mom.

Tuesday, March 13, 2012

Black Bean Salad with Corn, Red Peppers, Avocado, Cilantro and Lime


This is an incredible salad, packed with robust flavor and a powerhouse of nutrients.  I am a huge fan of avocado and black beans, so this was right up my alley. 

I found the recipe on Pinterest via Jennifer at Once Upon a Chef.  While I was there, I browsed her recipe index and pinned several more of her recipes.

Serve it as a side dish or all by itself.  It's da bomb!

Serving Size: 6-8*
Ingredients
  • 2 15-ounce can black beans, rinsed and drained
  • 3 ears fresh corn, cooked, cooled and kernels cut off the cob (I used frozen, thawed, for ease)
  • 2 red bell peppers, diced
  • 2 cloves garlic, minced
  • 2 tablespoons minced shallots (you’ll need one medium shallot)
  • 2 teaspoons salt
  • ¼ teaspoon cayenne pepper
  • 2 tablespoons sugar (I chose not to add this...didn't need it in my opinion)
  • 9 tablespoons extra virgin olive oil
  • 6 tablespoons fresh lime juice
  • 1 teaspoon lime zest (be sure to zest limes before juicing them)
  • ½ cup chopped cilantro, plus more to garnish
  • 2 Hass avocados, diced
Instructions
  1. Combine all ingredients except avocados in a large bowl and mix well. Cover and chill for a few hours or overnight. Right before serving, add avocados and mix gently, being careful not to mash avocados. Garnish with a few sprigs of freshly chopped cilantro if desired. Serve at room temperature.

*This recipe could easily be halved.  It makes a lot!

Wednesday, February 22, 2012

Feeding a Large Family Healthy Meals on a Budget

epically healthy meal time 021

So what exactly constitutes healthy eating?  I realize that we will all define healthy eating a bit differently.  Some may define it as homemade meals rather than fast food or convenience meals, and some may define eating healthy as an all raw and organic diet.  Whatever your definition is, there are always ways to squeeze more healthful foods into your budget.

For our family, eating healthy is fairly simple, and perhaps a little old-school.  It includes homemade meals, lots of fruits and veggies, whole grains, and watching our sugar intake.  We stick to the natural fats (BUTTER, Olive Oil, and Coconut Oil) and believe that red meat, dairy, and pasta are good for you when eaten in moderation. 

So how do we feed our large family healthy meals on a budget?  Here's some of how we do it.....

Read the full article here.

Friday, August 19, 2011

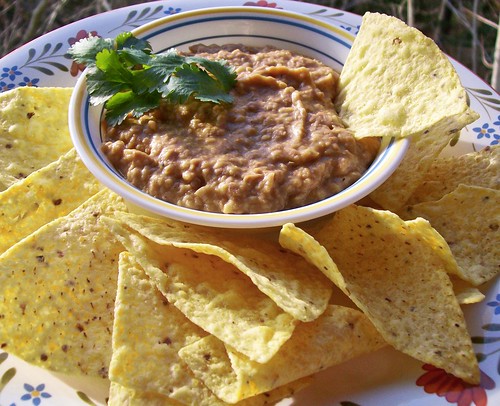
How To: Homemade Refried Beans

Homemade Refried Beans

We love beans.  We eat a lot of them because they're yummy, healthy, and CHEAP! 

We especially eat a lot of Refried Beans.  We make a 2 lb. bag of Pintos every two weeks. 

Did you know that 1 cup of Refried Beans is low in Saturated Fat, and very low in Cholesterol? It is also a good source of Protein (13g), Vitamin C, Magnesium, Phosphorus, Potassium and Manganese, and an excellent source of Fiber (12g...that's 49% of your Daily Value).

So what do we do with all those beans?  We make Quesadillas, Bean and Cheese Burritos, Bean Dip, Tostadas, and Touch Down Taco Dip.  We also use them as a side to enchiladas and tacos.  The kids even like to eat them in a small dish with cheese on top.  Having them on hand makes for SUPER EASY "go to" lunches and dinners. 

Let's get cookin'.

Here's what you'll need:

1 lb bag Pinto beans
1 stick butter (or any other fat such as bacon fat or lard...but everything is betta with butta!)
Salt, Pepper, and Garlic powder to taste


First, sort your beans.  Place a small pile on the counter at a time and pick out any dirt clots, rocks, or anything else that doesn't resemble a Pinto bean.


See that big, ugly clump of dirt?  Now aren't you glad you sorted first?

Here are the gems I found in my last bag.  El Grosso!


 As you're sorting your piles, throw the beans in a medium to large pot.


Now, give the beans a quick rinse....pour out water, and then refill pot to about an inch or two above the beans.


First stage done.  Go relax and let those babies soak all night.  (Quick soak method below)

When you're ready to begin cooking the beans, pour out the soaking water and refill with fresh water, again, 2-3 inches above beans.  I usually use hot water just to give the heating up process a jump start. 

Bring beans to a boil.  Be careful not to let those beans boil over while you’re not looking…the mess is a doozy!  But I wouldn't know about that.


Let boil for a couple of minutes and then reduce heat to low.  Simmer for 2 to 3 hours.  Stir occasionally and add water if necessary.  If you let all the water evaporate, your beans will burn, your pot will be lots of fun to clean, and your house will not smell very pleasant.  But I wouldn't know about that either!

When your beans are done, they will look plump and feel soft.  Drain some of the water.  Not all of it, though...about like this. 


Now pour the beans in a food processor.  If you do not have one, or you just don't feel like luggin' the huge thing out, use a masher.  Add butter, about 2 teaspoons of salt, a little pepper, and a little garlic powder.  If you're using a masher, be sure and stir the beans, 'cause those mashed beans stick to the bottom.


Process away!  Once you’ve reached your desired consistency, it’s time to taste.  Does it need more salt?  Probably so.  Maybe a little more pepper and garlic?  I don’t know…they're your beans.  Taste them!

Each time you need to add more seasoning, pulse or stir to blend.

Once you’ve got them all nice and seasoned, pour them into a container to cool.  Once cool, seal tightly.  Will store in the fridge for two weeks. 

So, you see, they’re not actually REfried, but that's okay...they still taste amazing!  But if you want to "re"fry them, have at it.

Here's the printable version:

Homemade Refried Beans

1 lb Pinto beans
1 stick butter
Salt, Pepper, and Garlic Powder to taste

Sort beans and place in medium to large pot.  Rinse with cool water and drain.  Refill to about 1-2 inches above beans.  Let soak all night.  If you don't want to wait until the next day, use the quick soak method.

*Quick soak method:  After rinsing beans, refill with hot water, and bring to a boil.  Boil a few minutes and then turn off the stove.  Let sit an hour...resume at this step below.

Drain soaking water and refill to about 1 inch above pot.  Bring to a boil.  Reduce heat and simmer for 2-3 hours.  If you're not sure when they're done, taste a bean to make sure it's very soft.

Drain some of the water, but not all of it.  Pour beans into food processor and add butter, about 2 teaspoons of salt, some pepper, and a little garlic powder.   Pulse (or stir if using a masher) to incorporate seasoning and butter.  Pulse until you get the desired consistency.  Taste often to check for seasoning.  Trust your instincts...you know what taste good to you!

Pour beans into air tight container.  Allow to cool and store up to two weeks.  These freeze well too.   Enjoy!

Photo Credit (top)

Thursday, September 11, 2008

Food Slicer

My New Baby

As our family has grown, we're always on the lookout to find things that will help our large family run a bit more smoothly or save us a little time. For obvious reasons we buy in bulk, which saves us money, but not so much on time as we have to process some of our meat, cheese and bread so that it is ready to be used.

Indeed, this new kitchen tool has proven to give us back a little of that time.
A couple of months ago, Greg bought me this food slicer. It's something I've wanted for a while, but patiently waited for the budget to allow! I can't tell you what an asset this has been in getting some of our food processed. We buy our cheese in 5 lb. bricks and we bake most of our breads. We also buy some of our lunch meat in whole pieces to serve multiple functions. Before the slicer, we spent a lot of time trying to cut and slice and trust me, it wasn't a pretty sight! Let's just say I'm not exactly the best free hand slicer in the world, and leave it at that! :-)

But now........we can turn this..........
Into this........in a matter of seconds..........
I give you.........our new and improved (looking) bread.......
Now bag those babies up............

Ahhhhh, life is good.........and a bit easier! Thank you, honey, for our new baby! :-)

Friday, May 25, 2007

Juicing


This is what I got for Mother's Day this year. I had always been interested in the concept of juicing fresh fruits and veggies, but I wasn't sure how often I would actually use a juicer.

During a visit with my friend Shannon, she juiced some carrots and offered me a taste. It was delicious! I didn't think I'd like just straight carrot juice but I did!

I got this juicer at Sams. It was a cheapie, and probably not a great one by juicing standards, but it works for me. I have used it nearly everyday, juicing pretty much everything! One of my favorite drinks is carrots, celery, and a tomato. I made this yesterday and then saved all the nutrient-rich pulp and added it to my spaghetti sauce.

Another good combination is an apple, a pear, and a piece of ginger. This one even helps with queasiness, something I really need help with at the moment.

There are two downsides to this juicer. One, is it's very large and it takes up a lot of counter space. Two, it's quite a clean up job. There are about six or seven pieces that have to be cleaned after each use. But the overall benefits have out weighed the downfalls.

I love my juicer!

Friday, February 16, 2007

Convenience Foods

Breakfast on a stick

"Convenience" Food for Thought


Is our generation becoming too dependent upon convenience foods? Is "saving time" costing us more than just our dollars? Read what Bethany over at Birth Dynamics has to say about it!
Related Posts Plugin for WordPress, Blogger...